Monday 19 July 2021

#6: Erosion & Reflection

(header photo - cracked vessel)


Sculptures with a theme of erosion, and I decided to combine this with an intended post about Reflection, otherwise this blog would end up being overly repetitive.


There two lines of enquiry with regards to my ceramics. On the one hand my work takes on rather solid linear forms, either through throwing or slab building. On the other hand I am deeply fascinated by the processes of erosion and change in nature, for reasons I cannot put into words. Inchoate. If I am fortunate to be at a beach, I would hope to see the drainage patterns made in sand when the tide turns. Large scale river deltas echoed in miniature and, better yet, can be observed forming in real time.

Eroded Vessel
The heavily grogged clay body of crank has a very rough texture when left unglazed. When fired at glazing temperature it has the colour and texture of a coarse grained dark sand. This was perfect for realising this design.


This was built simply through coiling. Then it was just a matter of carving away clay to simulate the patterns resembling the drainage rills on a beach. It would have been fun to try actually dripping water onto the vessel. One day, when (or if) I have a proper studio and time, I will actually try this to see how the clay behaves.

Spiky Form (see Post #2)
The gnarly texture of this sculpture is a study of transition. It is meant to look semi-natural, like tree bark - what was once a clean smooth spike has grown old and fissured, and now giving way to new spikes. The smoother, rippled side is influenced by just that - ripples on a beach.


Menhirs (see Post #5)
Already seen in the last post. The 'acid pitting' texture now has its proper context. Humans, and I mean humans in general, all over the planet are busily reshaping the surface of the planet, albeit on a scale very, very tiny relative to Earth as a whole. Some reshaping is significant enough to be clearly seen from space. So this begged the question: are humans a force of nature, just as much as wind and water? We are instinctively familiar with the differences between natural and man-made. But I think it is true that what man is doing in its activities, has to be considered natural. That isn't to say that all things we do are right (a lot of what mankind is doing is very wrong in my opinion). I digress. The issue, my argument, is that erosion is taking many forms beyond the patterns made by physical forces as a consequence of Humanity having big brains.

I eroded the surface of this menhir to create a surface that looks like it was eroded naturally...


Cracked Vessel (photos at top)
The 'Cracked Vessel' is an extension of the concept above and combines with the theme of the next and final post in this series. 

This is an extension of a degree project, 'Object of Desire' (below). We were tasked with creating an object that had properties of things we like. I combined 'naturalistic' clay sculpture with mirror surfaces that represents pure metal. 


 ~Jay, July 2021


P.S. Yes it took a really long time to get around to finishing off this entry.


Monday 24 December 2012

Post #5 - Menhir

'Acid' Pitted Menhir (#2) 2011

Another follow up to my slab builds, this time about enclosed sculptural forms I have been calling Menhirs.

The build followed the same procedure as my disastrous slab vase from earlier. This time, taking two oval shaped slabs and joining them completely, leaving a width at the base - won't do for it to fall over - then adding a simple slab to the bottom. For stability I would carve out a recess, and for identification put my unique stamp mark into that.

Fissured Menhir (#1) 2011

This one warped after glaze fire, but it did so, fortunately, in a way you wouldn't notice unless I pointed it out to you. Annoyingly I haven't taken a decent photo of it yet.  The pitted and grooved surfaces of these two Menhirs here are part of my interest in nature. I am fascinated by erosion and the changing landscape, and I'll come back to these themes for a dedicated post.


...and standing along alongside a 'flint' Menhir, an experiment in shape and texture. I used a wood carving tool to create a sort of napped flint-like texture. The final outcome was disastrous - this one came out severely bent after glaze firing. The only explanation must be the clay I carved away to create the texture, thinning the slab, therefore affecting the internal force balance during shrinkage. The poured glazed (had no chance to spray it) also has much to be desired. Still, another set of mistakes to learn from.


I don't have the resources to be more elaborate with my finishes. It would have been great if I could get a proper shiny metal glaze for the pitted areas, I would love to see it with a bright metallic finish. I've investigated the contrast between rough ceramic and smooth metal a few times now, and I will save commentary for yet another dedicated post.

~J~

Tuesday 11 December 2012

Post #4 - Horse

Copper enhanced, horse head sculpture (2010/2011)

Following on from the previous 'Tetrahedral' post. This is, what I will call a free-form slab sculpture. I envisioned the profile of an art-deco inspired horse - simple, minimalist curves. From earlier small tests I knew could achieve a certain shape that would echo a horses neck very closely.

This is an important project for being my first ever figurative sculpture.

Construction 'Green' Phase

The starting slabs, cut, gently bent, joined with thick slip. Don't remember much but I think it was tricky and needed an extra pair of hands. There was no way of making the front 'apron' until the first parts were joined, since it would have an unforeseeable shape. I used a large sheet of paper to capture the true shape of the space, tracing the edges. From that template I was then able to cut a shape that fitted (almost) perfectly.


I neglected to take progress photos of the head section. This part caused me a lot of problems. I originally had the face as two whole sides, but I was not happy with the way I was having to join them together, and they simply did not create a horsey essence. My solution was to split them up into sections. I used my original drawings to cut the 'cheeks', and using a gap filling slab made a partial cylinder. The cheeks joined straight onto the neck. The muzzle parts were then joined with straight slabs, and the snout closed over with an off-cut, as seen below.

The ears were an interesting problem. Normally horses ears stick up, but in the context of my sculpture, that just didn't work for me. After some consultation with Sam, I/we arrived at the swept back look. Horses do flick their ears back, apparently.

Now adding eyes and snout after excess trimming. This perspective above shows what I consider a weakness in the design - a narrowness at the base of the head. Not a major issue though, as the final result was strong enough to outweigh that shortcoming.

The mouth turned into a bit of a creative issue with Sam. I was ready to go with the nose shown above, can't remember if I had settled on the mouth, but I must have because Sam argued, successfully, that a horses mouth is kind of droopy at the corners. Frankly a gash for a mouth was letting it down, and the nose just didn't work. This needed a rethink


Nose re-sculpted, droopy bits added for the mouth. Looking back, I did not do enough preparatory design work on the nose. I had to make room for the mouth as it got too crowded. The photo above shows the slight step I added to the mouth near the end of the green stage. It was flat, originally, and seen in the round, the droops just looked awkward. Now it made sense. Also, I reshaped the eyes, creating a smooth blend with the cheek.

 Very final part of the green stage - drilling holes for the pins that would support the mane.


Fired
Safely surviving the bisque stage... looking good and it just about fit the kiln. I was aiming big with this piece.

 With the head safely hard, I could fit the pins and and get a preview of the mane...

And hence with the mane segments bisque fired and dry fitted...

The mane had a sharper texture from this side, my preferred view.

But this was not how I wanted it to look. I had wanted the strands to be streaming backward, in a unifed direction. I realised that there was not enough 'give' in the structure to allow that, even though I planned for it. Sam thought it looked good as a fan. I agreed to certain extent, but I could already see another drawback. Being sticky-outy, it would be a nuisance if they got snagged, mishandled, whatever. Breaking means replacing. I was already thinking ahead though - I would use copper sheet instead.


Finishing Off

Jumping ahead a bit now. Horse is safely home so I could finish it in my own time...

Horse painted with graphite powder and shellac. This was recommended (I thought) by Sam as an undercoat for a top finish of bronze (seen in photos below). It turns out I didn't need to bother 8'p

I ordered a couple of copper sheets. The price of the stuff was maybe two or three time higher than sheets I ordered a few years previous...
All cut, getting the absolute max by zigzagging across the long length of the very modest copper sheet. Was about the size of an A4 sheet. I couldn't waste anything. Next step was to gauge the bending line, tidy up the thick ends with round offs, then commit to bending - no errors allowed! Measure twice is an excellent motto...

Fitting brazing rod as anchors for the copper ribbons.

The direction that the holes made was an issue, being perpendicular to the neck profile. I had to make sure that the wire stayed in place, but without gluing them permanently. They had to be free enough to allow them to be taken out so the head and mane could be properly cleaned if need be. Once I had set the curvature into the rod, which is very stiff, it was critical getting the bends of the penetrating bits just so - out a fraction and the rod could not follow the neck profile. With the upper rod it was a close thing. The lower rod fitted flush perfect.

Another critical stage - I had to get the welding exactly right first time. Here the upper bar is complete. I put in a double bend as the ears were getting in the way. Hmm, on the other hand maybe I was getting ahead of myself. Bending copper is a pleasure, being highly malleable, but totally unforgiving if you make a mistake. With soft curves, corrections can be made easily. I used my finger - I forget which one 8') - as a form for curvature.

 And the solder welding underneath... a fun exercise with a small blowtorch and pre-cut lengths of solder.

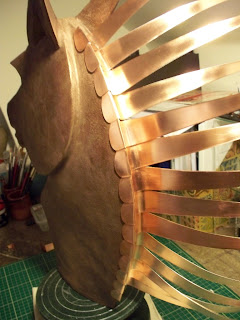
All welding completed. The spacing had to be perfect. The sticky point was bridging the gap between the upper and lower sections - there could not be any break or inconsistency in the overlapping pattern. All strips with double bend, as you can see. Ah yes, and the copper is polished, no, rubbed down with wire wool to clean off oxidation and my fingerprints. The next stage was to artistically arrange the strips into a flowing movement around the neck, as seen in the heading photo. Judging by the beautiful and subtle curves, I think this was perhaps the most satisfying part of the whole project.

And here he/she/it is, the finished article in the low light of desk lamps.


I cajoled my dad into making a plinth from an off-cut, otherwise the stone hard clay at the base would make a mess of polished wood (and glass and metal). A couple of days after finishing this, 'he' was put on display at a local art gallery ("What If...?" in Dartford). And a few weeks later he found a buyer.


Final thoughts 
A massive learning curve, challenging, frustrating, satisfying.


~J~


Thursday 22 November 2012

Post #3 - Tetrahedral


Vessel (2010)

I began slab building vessels in earnest in 2010, though I had a short flirtation in 2004. For someone like me, with some experience working with wood and metals, the ins and outs of the process was very easy to assimilate and it wasn't long before I was making substantial items like the object above.


It wasn't all plain sailing. I assembled a tall, two sided vessel, made by curving long slabs around a large cardboard tube, such that in plan view it  had an ovoid shape, with a simple slab section joining the base. Like the object in the headline photo, I was looking for more expressive ways of presenting the opening, not just a simple hole. So I made the neck of this two sided thing curved, asymmetrically. It looked fine from front/side, but edge on, though, it made a deep V shape. This shape would literally be the undoing of this vessel. The bisque fire presented no problems, though I seem to remember there was a crack. I carried on and glazed it. Mistakes happen, and I learnt from this one. My tall, reasonably elegant looking vase had split right open along the joint. Having studied engineering in my distant past, I knew it was because I had inadvertently made a stress point. Corners on any object are areas of maximum stress (that's why the tips of things break off more easily) and for an open V shape, even more so. So when the clay shrank during firing, the internal forces arising from the shrinkage pulled the joint open like a zip.

Some years ago I did some concept sketches, annoyingly undated but drawn sometime in 2004. Even then I was calling them 'Tetrahedral Forms' :


So far I haven't got anywhere near the more curved shapes I envisioned. In practice leather hard clay slabs are quite difficult to shape. I tried again with the vessel below:


Another Vessel (2011)


Curvature is relatively easy to achieve on a plane, but what I am after is a bulge on each of the faces. I think this will require a specific object (like a huge wooden belly for instance), such that I can allow fresh slabs to reach the leather hard state in a shape much nearer to what I want.

Another slab-build sculpture - much more free form than these - that I started building shortly after my first tetrahedral will be a follow on from this, as it deserves a post of it own.

Next post - Horse.

~J~


Monday 5 November 2012

Post #2 - Spikes


Spiky Form (2010)
All the work here was developed in parallel with the ceramics described in the Frustrum post. One basic shape, similar in all ways but scale. 

The finished installation above is a mix of porcelain and plaster spikes. I realised early that plaster would be impractical for mass producing the larger spikes. I hit upon a quick method - slip casting from a one piece plaster mold. I made two molds, and with the spikes being slip cast I was able to make a small amount of material go a long way. A vital aspect of a small budget.

For the smaller spikes I made a set of plastilene models of varying sizes, ranging from 30 to 150 mm in length. These I grouped as efficiently as I could and made three silicone molds. From these I could produce 40 plaster spikes at a time.
As part of the exhibition development, I played with the possibilities of lighting to see what shadows could be cast (above). In the event, the wooden walls in the building were much too dark to get a really effective display of shadow casting, but one of the test photos I took was chosen to appear on the group show poster...

Another view of the finished work. The installation was arranged either side of a pillar, making a sinuous trail. If there had been more time they would have been stuck onto the pillar as well, heading up to the ceiling.

Eastgate House in Rochester was a large space for us to fill. We had six separate rooms on two floors, all quite large, but since nobody else had anything that could fill the stairwell, I designed this 'vortex' to fill the two story void. The support plate at the top was fixed to a mirror ball motor. Had quite a time getting the thing balanced - notwithstanding the in-situ assembly. Also the whole structure had to be within the max loading spec of the motor. This necessitated cutting great big chucks out the support plate to just the parts needed to hang the threads.
The whole rotating vortex worked out very well. The stairwell had white walls so the shadows cast were much clearer, but was it was a shame it couldn't be viewed at night - the windows let too much light in. The video I shot is still on tape, and annoyingly accessible only by an old, increasingly incompatible camcorder.


Spikes Repurposed

Apart from the vortex, I recovered everything from that exhibition - maybe sixty porcelain spikes, hundreds of the small plaster ones. A year after the Eastgate House show, I had my first solo exhibition, at the Peter Blake Gallery in Dartford Library. This was my graduate show. I worked on one main installation for this final unit, but the gallery had a lot of space to fill, so from all those leftover spikes, I put this together:
Despite the limitations of the rail lighting, I was able to pull something out of the situation and this successfully  filled a large wall space.


A couple of years later...

Finally, back to making ceramics, though a measly four hours a week at Gravesend Adult Education (though Sam was good enough to let me take some clay work home with me.) I had an idea to use up my porcelain spikes, an echo of my old ideas, this time, new 'clean' spikes emerging from an old, gnarled parent.
Spiky Form at the 'What If...?' Gallery, Dartford. GNB and Norman Church in reflection.


Glazing...
Some of the remaining porcelain spikes. Whenever I used a stoneware glaze for my 'normal' wares, I would use a couple of spikes to make a test of that glaze on porcelain, which is not a regular part of the material in the studio.

I haven't taken any extreme close up photos of these as yet, but I will make a point of it as some of patterns that emerged are very striking indeed.


Next post: Tetrahedral


~J~

Tuesday 16 October 2012

Post #1 - Frustrum*

*a frustrum is a truncated cone. May or may not be technically accurate, but it serves. Would also stand for frustrated if I had my way - 'I am having a frustrum'.

I was going to cover my build of an art-deco style horse head, but I thought it better to be a bit more chronological to start off my blogging (although, in contradiction, I have started with recent images because they are more likely to be attention grabbing in the previews)

Beginning at the end then:

Coral Form, 2011, White Earthenware

So lets get going with some sketches, the bare bone origins. This is how this line of work all started:


'Sea slug', Feb 2004


... hmm. I had completely forgotten how this originated, but I think it's self explanatory now. My note is interesting: 'thrown cones'. I never tried to do that but I know it would have been very tricky getting them into a long and tapered form - not to say curved as well. How I eventually achieved this... well, I'll at least show the end result if not describe the minute detail as this post progresses.


And here the 'sea slug' concept is given an improved treatment on a sheet of A2 (March 2004). A useful way to spend a lunchtime or three.


My pottery tutor at the time - Ed Gould - told me I could use some sort of tubey, foamy things (otherwise known as pipe lagging) to make a former. In the event, my method was very different, and owed much more to a happy accident and my old technical drawing skills. But it was three years before I finally made one for the final project of my Foundation degree.

Note - during an earlier degree unit titled 'Balance and Tension' I got very interested in the concept of 'unbalanced' shapes. In particular, forms that would not be stable without some counterbalance. The Sea Slug formed a mental precursor to this idea.

So I had to find a way to make a former to actually build the thing. The photo below ably shows the stages of construction, starting with a cardboard core. If you ever scored a curve on piece of heavy paper or card, and then folded it to make a dune shape, that was the germ behind the technique employed to make these. The cross-section, perpendicular to the curved axis, is equilateral from top to bottom, each card disk has a equi-triangle cut out (all various sizes of course), and threaded as shown. I only needed to fix each disk with tape. I then wrapped the whole thing in plastic, followed by plaster bandage and a final smothering of plain plaster. 


Finished plaster former, and alongside, the core of a miniature version I never skinned.


A CG visualisation, refining my original design. I made a number of design sketches exploring the small-cone-on-big-cone idea, seeing what other combinations would work based on the one basic shape, settled on making one alternate. I considered using porcelain for its translucency, and I did make a small test piece, but on advice I settled on white earthenware, which is much easier for hand-builds. The complicated technical part was over with, or so I thought. But I kind of already knew that the join between the main sections needed some precision, I needed a 'true shape' development, solved (or improvised, more like) by using more of those old fashioned technical drawing skills.

I think I spent a week making the forms. With relief I did my final smoothing on the joints, said 'that's it, all done', and relaxed. Except relaxing was not on the cards. A few minutes after I sat down on the sofa, my back went into the most excruciating spasms. Agony. I'd been aware of tension buildup, muscle ache, having to stand, hunching over with arms lifted, but never ever was I expecting to get tortured by this project when I was done with it...

I was fortunate to be working at a school while I was studying (part-time, both), with access to a kiln. I wanted to make the first form as big as I could, and it comes in at 55 centimeters long having been calculated to fit (while green) in a 60cm space (the max diagonal of the kiln).


#1, white earthenware, 2007


#2, white earthenware, 2007


I experimented with moving light sources to light my creations. I was waving two Maglites from different directions, from below, generating very surreal, shifting shadow casts. I seriously wanted to make a rig with reciprocating arms with bright LED bulbs, but it never got past this improvised test.


The two forms ended up in a display cabinet at the end of year show (Eastgate House, Rochester). Not really what I wanted, but I wasn't bothered at the time. That's because I planned and made two other installations, building further on curved cones. I will talk about these in my 'Spiky' post another time.

So I come to the end of my first full post. Ah. Almost forgot to mention the Coral Form right at the top. Made this last year, the main body made exactly the same way as the forms above. The added 'extrusions' are another matter, being made with my Spiky method. Stay tuned - follow me, bookmark this site, etc. I will write about that, eventually.

~J~


P.S.
Last year, a very knowledgeable chap named Simeon told me that cones were perhaps the hardest shape to make in clay. He's not wrong. 

P.P.S.
In the near-ish future I want to take the method I developed into an extreme form, and build an 'Id's Talon'. I'll let you hazard a guess as to what that might be in the image below. And top marks if you understand my reference ;)